By accepting you will be accessing a service provided by a third-party external to http://www.wsi10.com/
智能电子标签
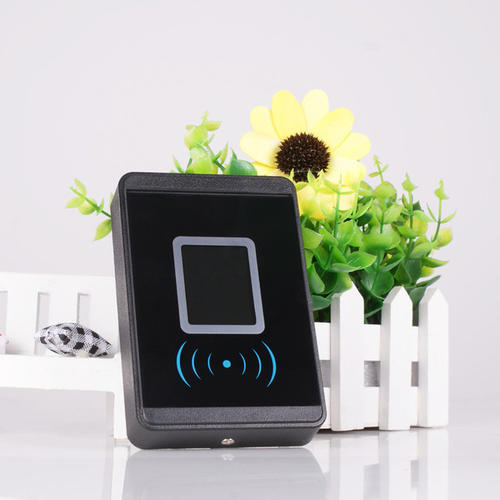
智能电子标签
电子标签是RFID技术的载体。电子标签又称射频标签、应答器、数据载体;阅读器又称为读出装置、扫描器、读头、通信器、读写器(取决于电子标签是否可以无线改写数据)。电子标签与阅读器之间通过耦合元件实现射频信号的空间(无接触)耦合;在耦合通道内,根据时序关系,实现能量的传递和数据交换。 RFID其原理为阅读器与标签之间进行非接触式的数据通信,达到识别目标的目的。RFID 的应用非常广泛,典型应用有动物晶片、汽车晶片防盗器、门禁管制、停车场管制、生产线自动化、物料管理
配件清单:
ESP8266
ESP8266电源线
RC522-IC卡感应模块
杜邦线
开发环境:
Arduino IDE 1.8.9
PHP的运行环境:PHP+mysql+apache
PHP 7.1.31
Apache 2.4.41
Mysql 5.7.27
配件介绍:
RC522-IC卡感应模块:MF RC522是应用于13.56MHz非接触式通信中高集成度的读写卡芯片,"三表"应用推出的一款低电压、低成本、体积小的非接触式读写卡芯片,是智能仪表和便携式手持设备研发的较好选择。MFRC522利用了先进的调制和解调概念,集成了在13.56MHz下所有类型的被动非接触式通信方式和协议。支持14443A兼容应答器信号。数字部分处理ISO014443A帧和错误检测。此外还支持快速 CRYPTO1加密算法,用语验证 MIFARE系列产品。MFRC522支持 MIFARE系列更高速的非接触式通信,双向数据传输速率高达424kbit/s。作为13.56MHz高集成度读写卡系列芯片家族的新成员,MRC522与 MFRc500和MFRC530有不少相似之处,同时也具备许多特点和差异。它与主机间通信采用SPi模式,有利于减少连线,缩小PCB板体积,降低成本。
ESP8266:NodeMCU,是一个开源的物联网平台。 它使用Lua脚本语言编程。该平台基于eLua 开源项目,底层使用ESP8266 sdk 0.9.5版本。该平台使用了很多开源项目, 例如 lua-cjson, spiffs. NodeMCU包含了可以运行在 esp8266 Wi-Fi SoC芯片之上的固件,以及基于ESP-12模组的硬件。
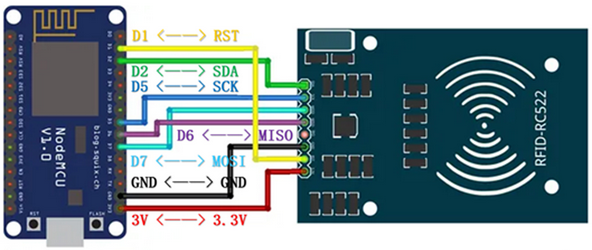
硬件连线图:
在Arduino IDE中安装ESP8266以及库文件
- l在Arduino IDE中安装ESP8266开发板:
https://randomnerdtutorials.com/how-to-install-esp8266-board-arduino-ide/
- l在Arduino IDE中安装RFID库:
https://github.com/miguelbalboa/rfid
Arduino源码:
#include <ESP8266WebServer.h>
#include <ESP8266HTTPClient.h>
#include <SPI.h>
#include <MFRC522.h>
#define SS_PIN 4
#define RST_PIN 5
MFRC522 mfrc522(SS_PIN, RST_PIN);
#define ON_Board_LED 2
const char* ssid = "xuyue615";
const char* password = "xuyuenmt";
ESP8266WebServer server(80);
int readsuccess; byte readcard[4]; char str[32] = ""; String StrUID;
void setup() {
   Serial.begin(115200); //--> Initialize serial communications with the PC
 SPI.begin();      //--> Init SPI bus
 mfrc522.PCD_Init(); //--> Init MFRC522 card

 delay(500);

 WiFi.begin(ssid, password); //--> Connect to your WiFi router
 Serial.println("");

 pinMode(ON_Board_LED, OUTPUT);
 digitalWrite(ON_Board_LED, HIGH); //--> Turn off Led On Board

 //----------------------------------------Wait for connection
 Serial.print("Connecting");
 while (WiFi.status() != WL_CONNECTED) {
   Serial.print(".");
   //----------------------------------------Make the On Board Flashing LED on the process of connecting to the wifi router.
   digitalWrite(ON_Board_LED, LOW);
   delay(250);
   digitalWrite(ON_Board_LED, HIGH);
   delay(250);
 }
 digitalWrite(ON_Board_LED, HIGH); //--> Turn off the On Board LED when it is connected to the wifi router.
 //----------------------------------------If successfully connected to the wifi router, the IP Address that will be visited is displayed in the serial monitor
 Serial.println("");
 Serial.print("Successfully connected to : ");
 Serial.println(ssid);
 Serial.print("IP address: ");
 Serial.println(WiFi.localIP());

 Serial.println("Please tag a card or keychain to see the UID !");
 Serial.println("");

}
 void loop() {
   // put your main code here, to run repeatedly
 readsuccess = getid();

 if (readsuccess) {
   digitalWrite(ON_Board_LED, LOW);
   HTTPClient http;    //Declare object of class HTTPClient

   String UIDresultSend, postData;
   UIDresultSend = StrUID;

   //Post Data
   postData = "UIDresult=" + UIDresultSend;

   http.begin("http://192.168.1.27/NodeMCU-and-RFID-RC522-IoT-Projects/getUID.php");  //Specify request destination
   http.addHeader("Content-Type", "application/x-www-form-urlencoded"); //Specify content-type header

   int httpCode = http.POST(postData);   //Send the request
   String payload = http.getString();    //Get the response payload

   Serial.println(UIDresultSend);
   Serial.println(httpCode);   //Print HTTP return code
   Serial.println(payload);    //Print request response payload

   http.end();  //Close connection
   delay(1000);
   digitalWrite(ON_Board_LED, HIGH);
 }

 }
 int getid() {
   if (!mfrc522.PICC_IsNewCardPresent()) {
   return 0;
 }
 if (!mfrc522.PICC_ReadCardSerial()) {
   return 0;
 }


 Serial.print("THE UID OF THE SCANNED CARD IS : ");

 for (int i = 0; i < 4; i++) {
   readcard[i] = mfrc522.uid.uidByte[i]; //storing the UID of the tag in readcard
   array_to_string(readcard, 4, str);
   StrUID = str;
 }
 mfrc522.PICC_HaltA();
 return 1;

 }
void array_to_string(byte array[], unsigned int len, char buffer[]) {
  for (unsigned int i = 0; i < len; i++)
 {
   byte nib1 = (array[i] >> 4) & 0x0F;
   byte nib2 = (array[i] >> 0) & 0x0F;
   buffer[i * 2 + 0] = nib1  < 0xA ? '0' + nib1  : 'A' + nib1  - 0xA;
   buffer[i * 2 + 1] = nib2  < 0xA ? '0' + nib2  : 'A' + nib2  - 0xA;
 }
 buffer[len * 2] = '\0';
}
以上教程参考:
https://theiotprojects.com/connect-rfid-to-php-mysql-database-with-nodemcu-esp8266/
淘宝产品:
卫水士店铺:
https://shop141440422.taobao.com/?spm=a23or.7195193.1997079397.2.360a5920krjUI1
相关产品:智能电子标签套装