By accepting you will be accessing a service provided by a third-party external to http://www.wsi10.com/
紫外线传感器套装
让我们来研究:紫外线传感器模块
这是如何使用UVM-30A紫外线传感器的快速介绍,希望它将使您充满信心地将紫外线感应技术结成到您自己的项目中,或许也可以将您'晒黑'。
本示例将演示如何使用 ESP8266在紫外线传感器响应的照射范围内读取数据。
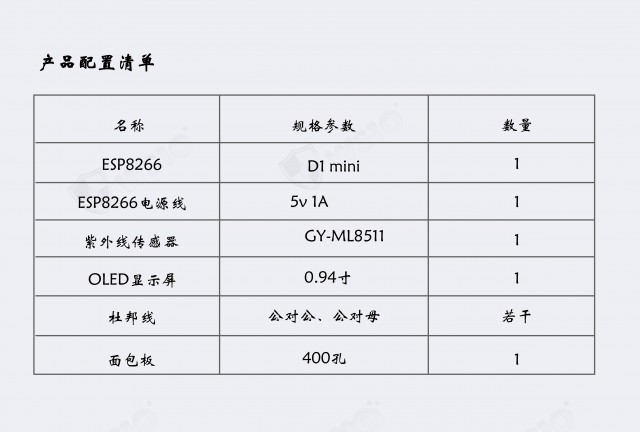
硬件准备
开发环境
我们使用Arduino软件来编写本项目的程序。而至于如何在ESP8266中配置ESP32的开发环境,并不在本文的介绍范围内,请您自行查阅其他相关资料。
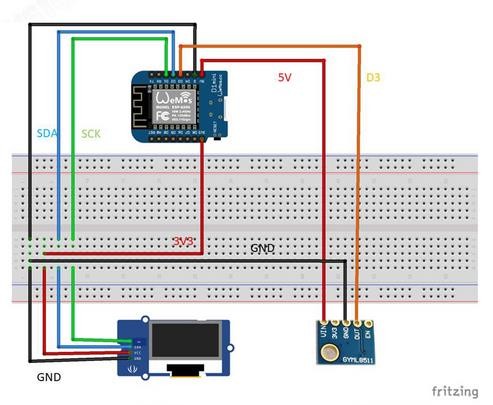
硬件连线图
读取紫外线数据
下述代码由定义、设置和循环组成。
首先设置A0引脚,然后分配一个变量来存储读取的该引脚呃值。这样可以在以后的程序中更方便地使用。设置程序会通知系统该引脚状态为输入,然后启动串行连接。接下来我们进入循环,在这里读取A0上的数值并将其赋值给之前声明的变量中。然后我们将其发送到串行监视器,以便可以在屏幕上读取值。
您需要将下面的代码加载到Arduino IDE并上传。
int analogApin = 0; // define OUT signal pin

int analogA; // define variable to store value read from pin

void setup() {

pinMode(analogApin, INPUT); // set the OUT signal pin as an input

Serial.begin(9600); // launch the serial monitor

Serial.println("Flux Workshop Example");

}

void loop() {

analogA = analogRead(analogApin);// read the voltage level on the A0

Serial.println((String)"UV level: " + analogA); // send the result to the serial monitor

delay(200); // pause for a moment before repeating

}
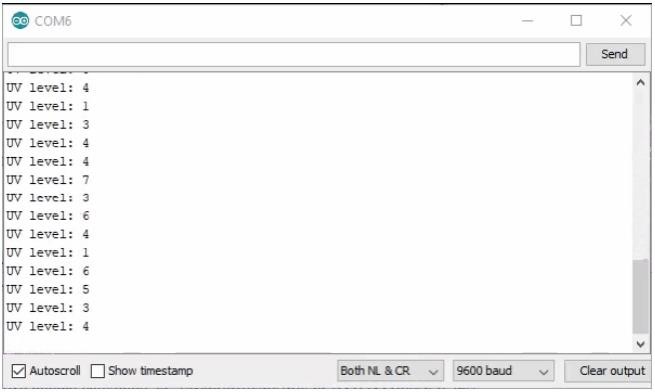
实验结果
在加载好程序的ESP8226电路板与其他配件连接好之后,串行监视器将产生如下所示的输出。请注意,在下面的例子中,数值较低是由于在实验室中进行测试的造成。当阳光充足/紫外线灯下时,结果读数应在30左右。
Comments
No comments made yet. Be the first to submit a comment


